Quickstart tutorial 2: Vote cross-chain on asset to borrow
In the first quickstart tutorial you were able to see how easy and effcient it is to go from project setup to sending your first packet. The contracts we used there were rather basic though, not representative of a real world use case.
In this second tutorial we'll explore a more realistic application that will also focus more on using your own smart contract development environment.
What will you be developing?
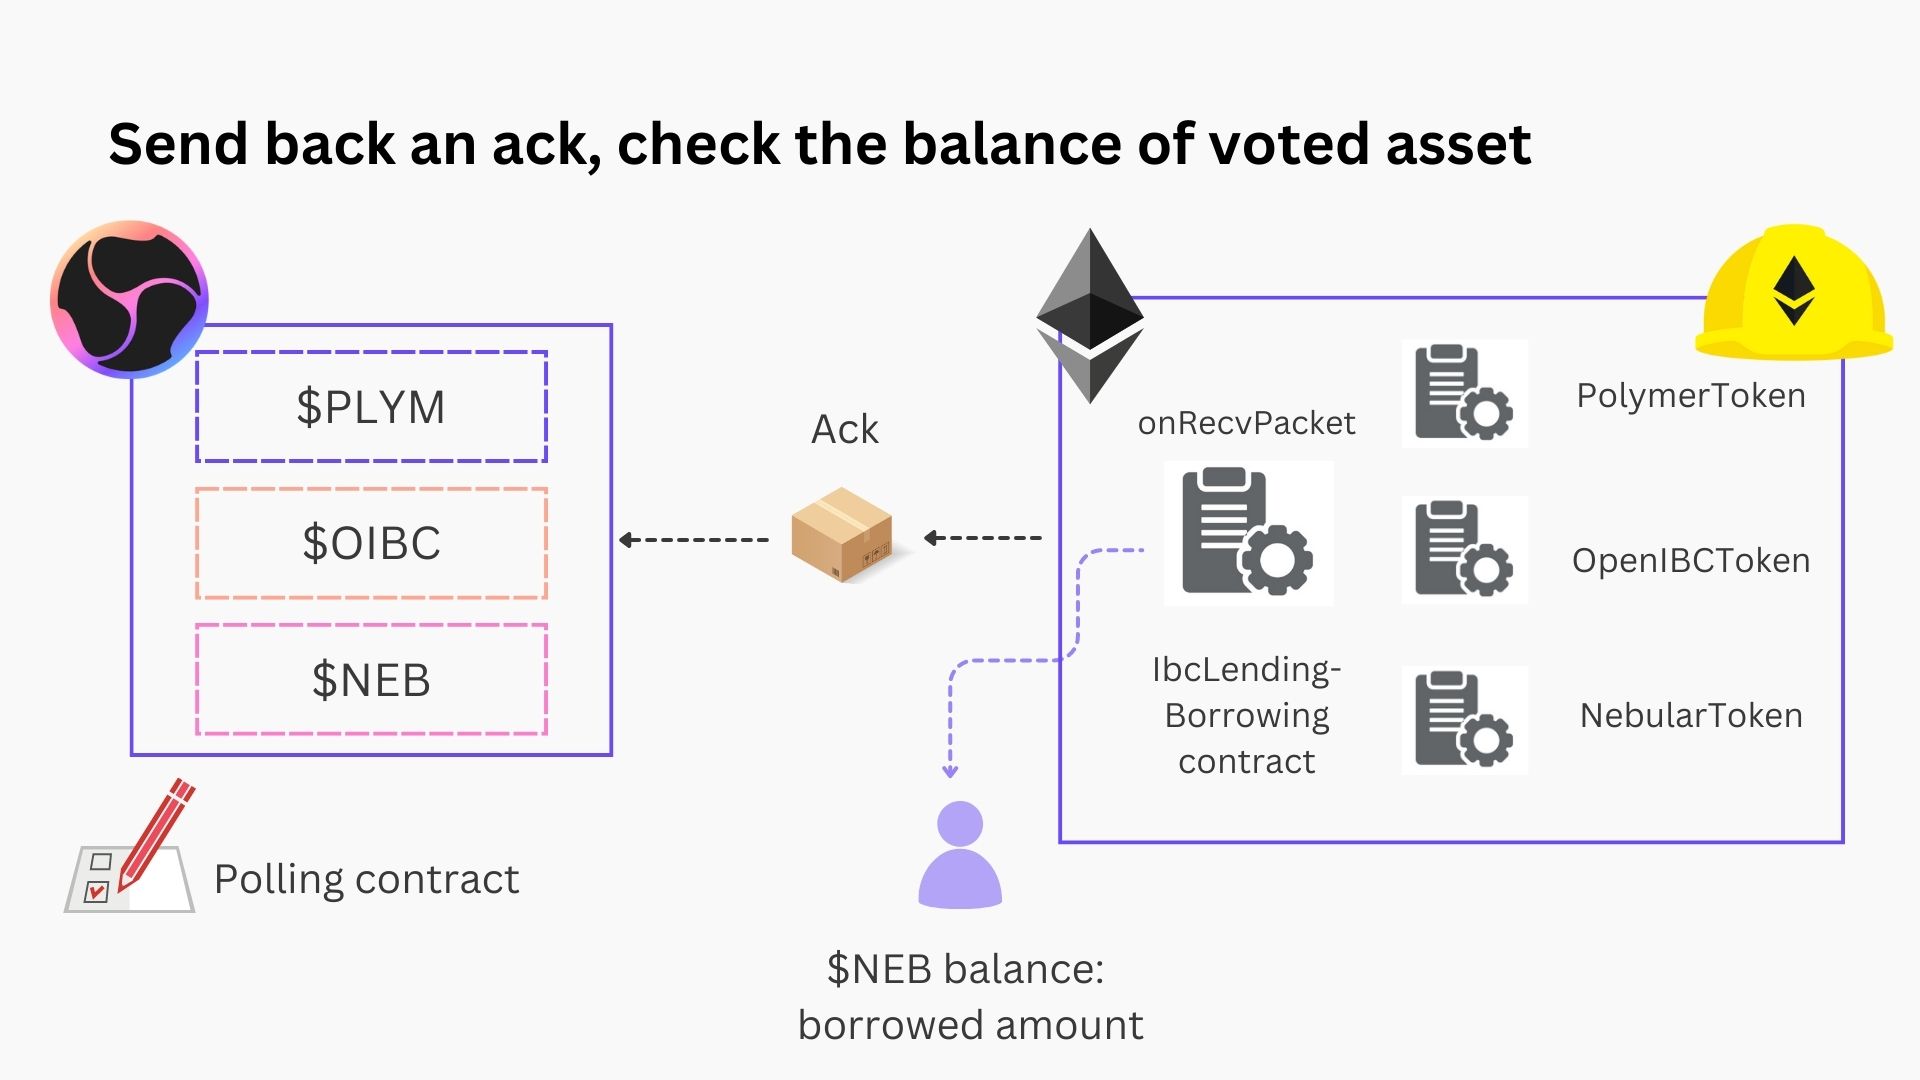
Consider a lending/borrowing application (think Aave, Compound, MakerDAO, Umee, ...). We'll have a simplified version of this application by deploying an IBC enabled IbcLendingBorrowing contract, as well as 3 Token contracts (inspired by the Hardhat tutorial). Instead of directly lending and borrowing though, we'll have polling smart contracts on a remote chain vote on what asset to borrow (having collateral provided). Then when the poll has ended and the votes have been cast, we'll send an IBC packet with information about the poll and the winning token to be borrowed cross-chain.
For this tutorial the lending/borrowing will happen on Ethereum, the polling contract (credits to the tutorial on SparkIBC's YT channel) will be deployed to a wasmd chain.
- Deploy contracts (IBC enabled
IbcLendingBorrowingcontract + 3 Token contracts) on ETH using Hardhat - Interact with the deployed contracts through client library (Harhat/ethers.js in this case)
- Have IBC enabled contracts on Ethereum send and receive packets, enabled by virtual IBC
- Deploy and interact CosmWasm contract through
ibctlCLI tool - Advanced event and packet tracing to check the status of your IBC packets
The following assumptions are made before you start:
- you've gone through the installation process and have the
ibctlbinary installed, if not please refer to the installation instructions - you're comfortable with the basic IBC semantics, if not please refer to the IBC high-level overview page
- you're comfortable with the EVM and CosmWasm dev enviroments and how to interact with chains (through client libraries)
- you've got a healthy dose of enthusiasm ready to explore our cross-chain voting/borrowing application 🚀
Preparation steps
Now, for the quickstart tutorial you can follow along with the example projects/contracts we'll provide.
Example contracts:
Clone the Quickstart tutorials for IBC SDK GitHub repo to follow along with the tutorial:
- The EVM project side of the project can be found in the
lending-borrowing-EVMfolder. It includes the IBC enabledIbcLendingBorrowingcontract + 3 Token contracts. It's a Hardhat project, so to be able to runnpx hardhat [command], make sure to runnpm installfirst. - The CosmWasm side of the project can be found in the
lending-borrowing-CWfolder. It includes the polling contract. You'll find the contract .wasm bytecode in the/artifactssubfolder if you don't want to bother checking out the code (the tutorial allows you to follow along without doing so).
Starting the IBC SDK
If this is the first time you're running the IBC SDK or you've deleted your configuration file you'll need to initialize your workspace:
ibctl init
Now you can get to work. Start the CLI tool:
ibctl start -c wasm:polymer -c polymer:eth
Note that for simplicity reasons, the tutorial is designed in such a way that it should reliably reproduce the same results if you follow all the steps in exact order. The contract addresses that are assigned to the contracts of the project are deterministic and hard coded in some places, as well as the the address of signers of some messages when interacting with the CLI.
Therefore, if you run into trouble or had to run through a step twice due to an error (e.g. the channel handshake got interrupted for some reason), it might be wise to stop the IBC SDK with ibctl stop and start from scratch.
Nevertheless, it IS possible to continue without stopping if you understand what to update.
When everything is set up, check the running containers:
ibctl show
During development, you'll likely want to connect your development environment with the multi-chain environment set up by the IBC SDK. The ibctl show command reveals the RPC endpoints that are exposed for you to interact with.
For example, when using Hardhat you find the endpoint where 'eth:main' is exposed and you can set it to an environment variable ENDPOINT:
export ENDPOINT=$(ibctl show | grep 'eth:main'| awk -F"│" '{gsub(/^[ \t]+|[ \t]+$/, "", $5); print $5}' | awk -F"'" '{print $2}')
Make sure you're storing the environment variable in the terminal tab you use to run the Hardhat commands from (as you may want to split up the different sides of the project and execute them in different terminal tabs or windows).
In case the above command doesn't work for your shell, either find an alternative to automatically retrieve the endpoint or fill it in manually:
export ENDPOINT='http://127.0.0.1:<variable-port>'
The Hardhat config in the project you've cloned, reads this environment variable to ensure your Hardhat network is set to the IBC SDK spun up network.
// ...
const endpoint = process.env.ENDPOINT
// ...

/** @type import('hardhat/config').HardhatUserConfig */
module.exports = {
  solidity: '0.8.19',
  networks: {
    localibcsdk: {
      url: endpoint,
      accounts: [
        '0x15188f87d4fd462b13c8f3b81c3a818ceb68fb596da273d6b7ee9f05f588e207',
        '0x75558cf96f6f28bb489fd33cbfc38aa2311bcb6586a9742f9586da809dd57fe2',
        '0xea6ad02a06e84b195f65a7e01ab32440a8914e523d53be71aba370167ce94ae9',
        '0xbaeb0652f541c24abdf69216fec5136bda1a013dea71ab24bb3b477143efa9ef'
      ]
    }
  }
}
The accounts (unless you want to add more) can be left as is and will provide you 4 (technically 5 but we reserve one for the relayer) default funded accounts.
You can use the following command to get more information about the accounts the IBC SDK has created on the ETH chain:
ibctl accounts eth:main
You'll notice that the private keys for the last 4 accounts there are the same private keys used in the Hardhat config.
Deployment and channel creation
Now, you can deploy the contracts on the EVM.
First, run npm install in the project's root directory. Then run the following script:
npx hardhat run scripts/deploy.js --network localibcsdk
On the Cosmos side, store the project's root directory as ROOT_DIR environment variable and run:
export ROOT_DIR=$PWD
ibctl deploy wasm wasm158z04naus5r3vcanureh7u0ngs5q4l0gkwegr4 $ROOT_DIR/artifacts/ibc_poll_messenger.wasm
You've now deployed IBC enabled contracts on both sides, the remaining thing to do is to create an IBC channel. Remember that the IBC SDK has set up the required clients and connections on the start command.
You can always check the clients/connections/channels with the command:
ibctl [clients/channels/connections] <chain-name>
Create a channel between the IBC enabled contracts on the EVM and Wasm side:
ibctl channel $'eth:polyibc.Ethereum-Devnet.37FA111284FBF97318CBe05C37fEC69071Dd4965:1.0' $'wasm:wasm.wasm14hj2tavq8fpesdwxxcu44rty3hh90vhujrvcmstl4zr3txmfvw9s0phg4d:1.0'
You'll see the terminal output the different steps of the channel handshake. If successful, you now have a channel set up to send IBC packets over! 📦
Contract interaction
Now that most of the infrastructure setup is out of the way, you can start interacting with the contracts which will culminate in sending some IBC packets back and forth.
EVM side
On the EVM side, we need to prepare the following:
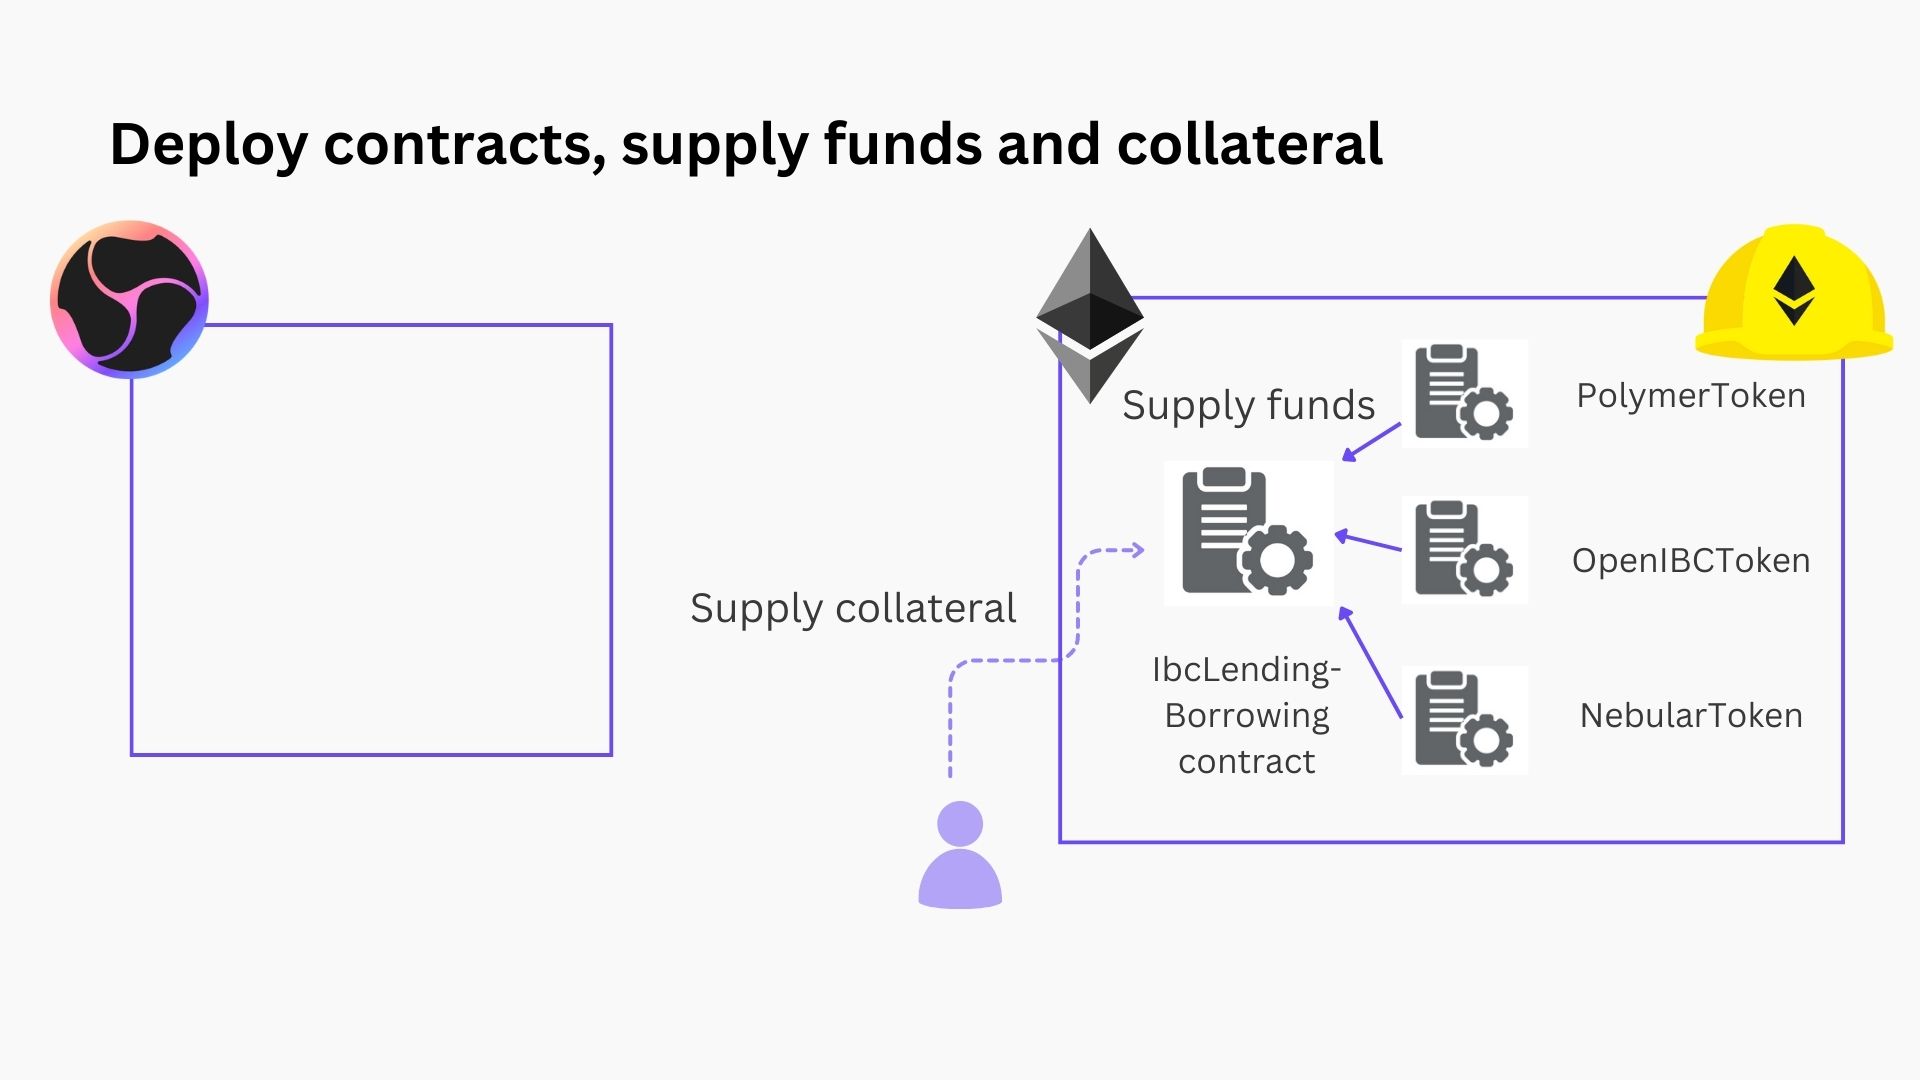
- For the three possible assets we can vote to borrow, we first need to supply funds to the
IbcLendingBorrowingcontract - Then we need to supply some collateral, to borrow the winner of the vote on Wasm chain
This is captured in the following script:
npx hardhat run scripts/interact.js --network localibcsdk
To let the Wasm chain know that we've provided collateral, we can use the IBC sendMessage functionality.
It's included in the scripts/send-message.js script:
npx hardhat run scripts/send-message.js --network localibcsdk
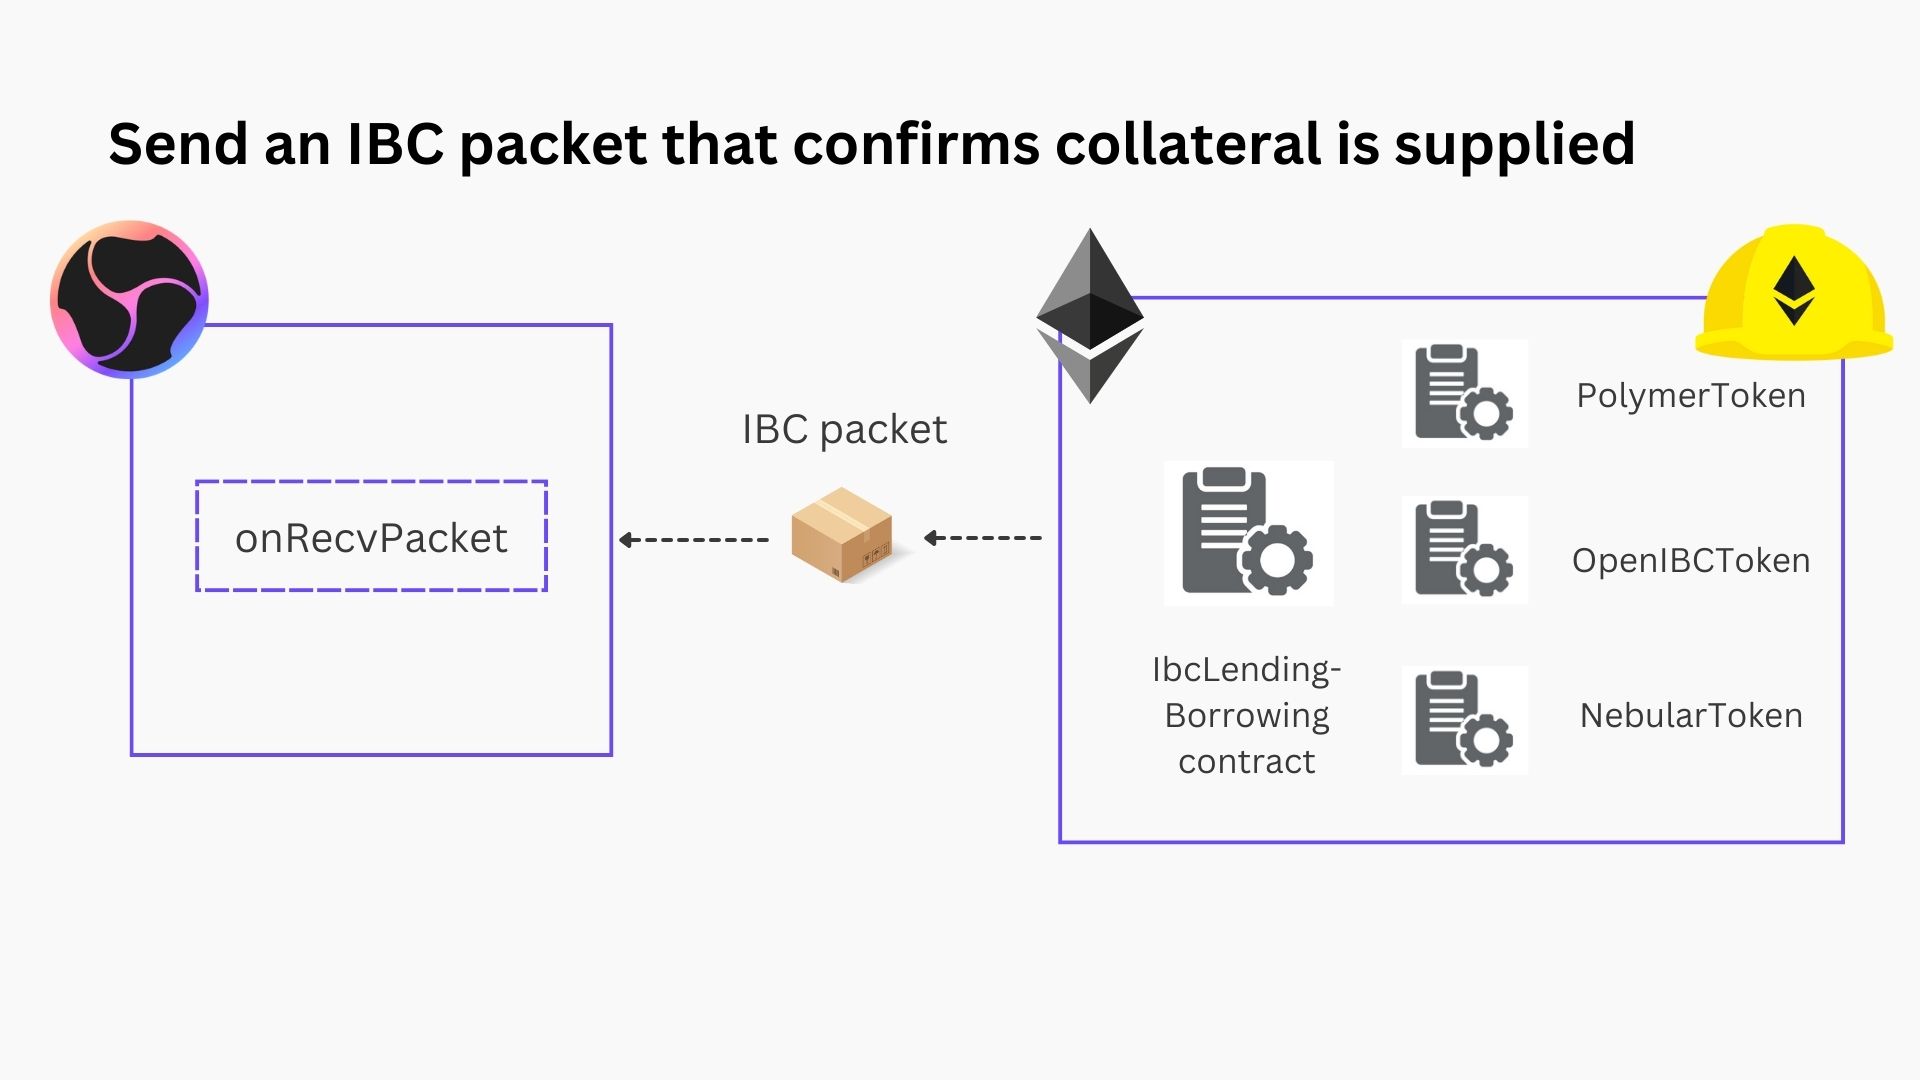
It will send the message "Collateral has been supplied". The polling contract on the wasm side will receive this message so the poll on what asset to borrow can begin...
Now you've given the instructions to send a packet, but how do you know if it was successful? And equally important, how to check if it was received on the destination?
To investigate this, the events command gives a list of events. For example, to check if the packet got received on the destination (the wasmd chain in this instance):
ibctl events wasm -x
Note that the flag -x shows more details and is optional. Similarly you can check the source chain and Polymer middle hop for events.
CosmWasm side
On the Wasm side, we need to do the following:
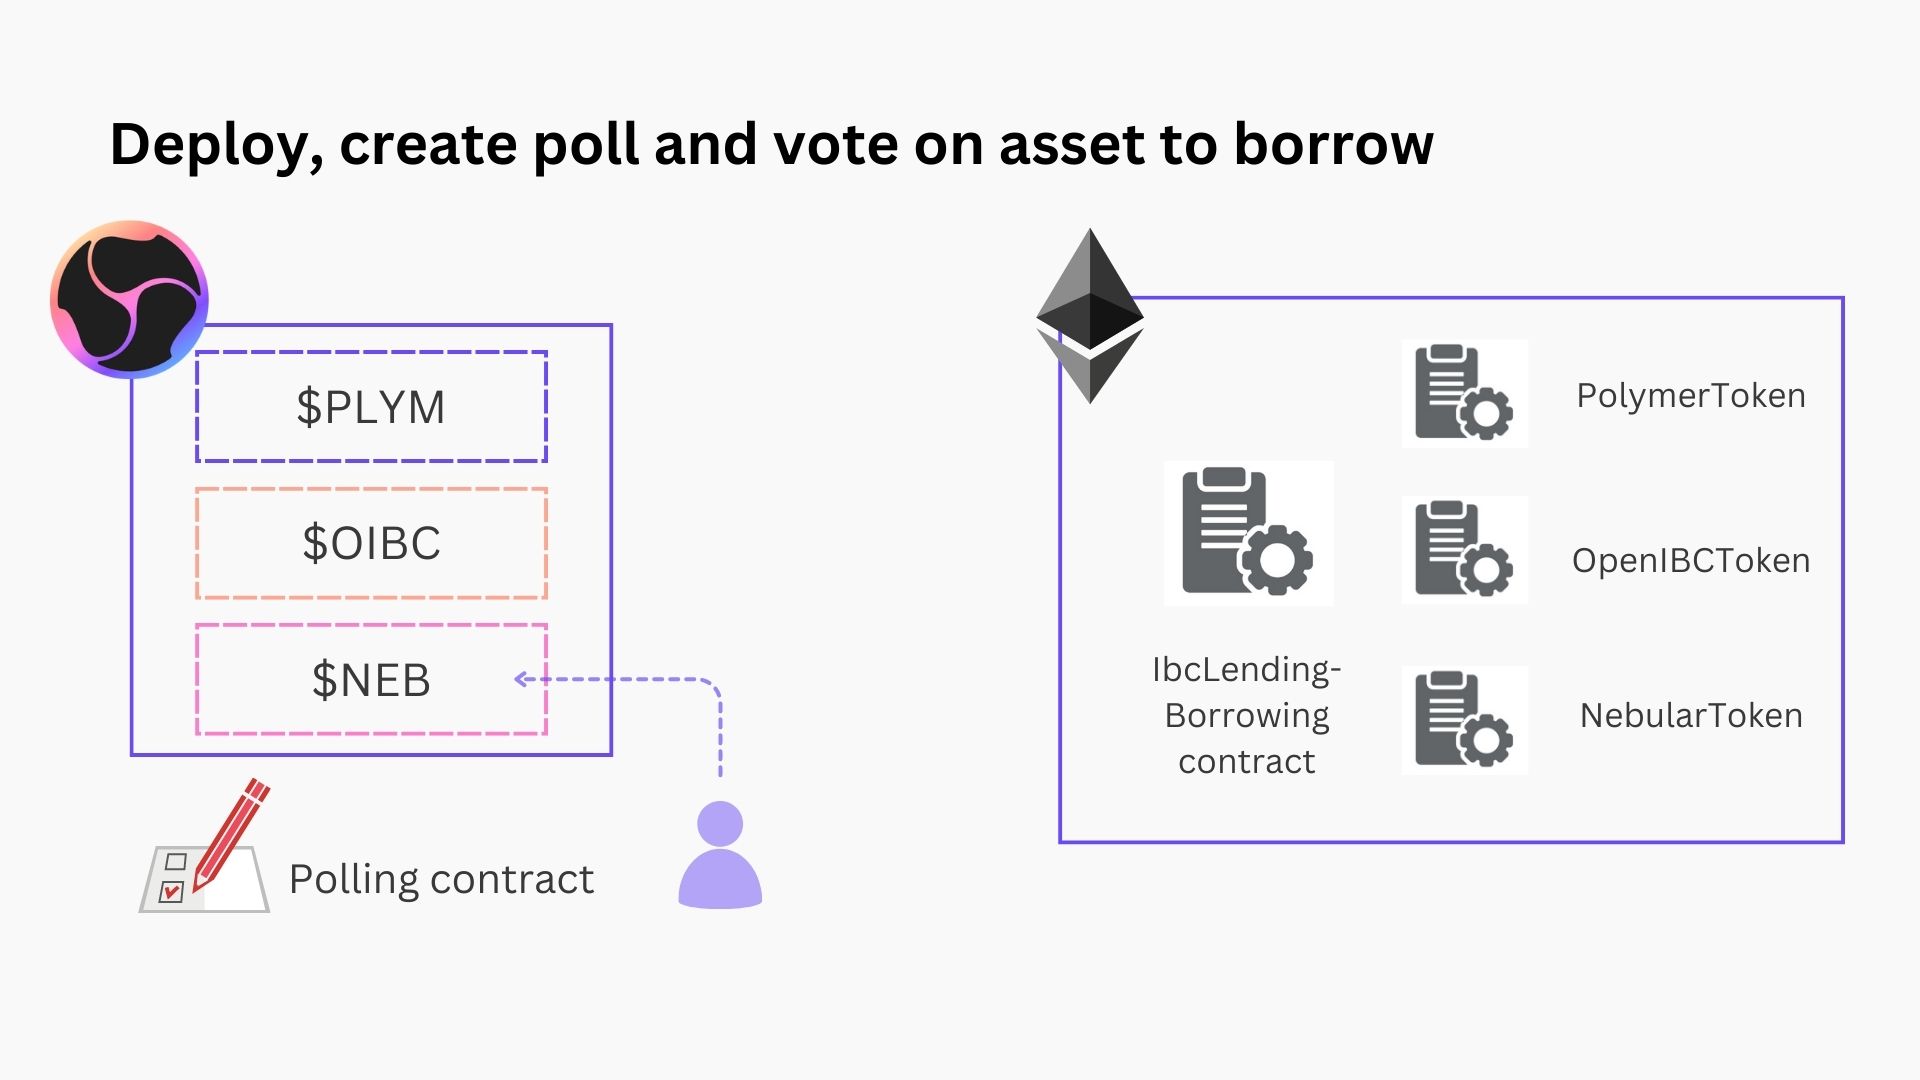
- The admin (who deployed the contract) can create a poll (with the 3 options corresponding to the 3 tokens to borrow).
- Every user can vote on one of the options
- Only the admin can end the poll
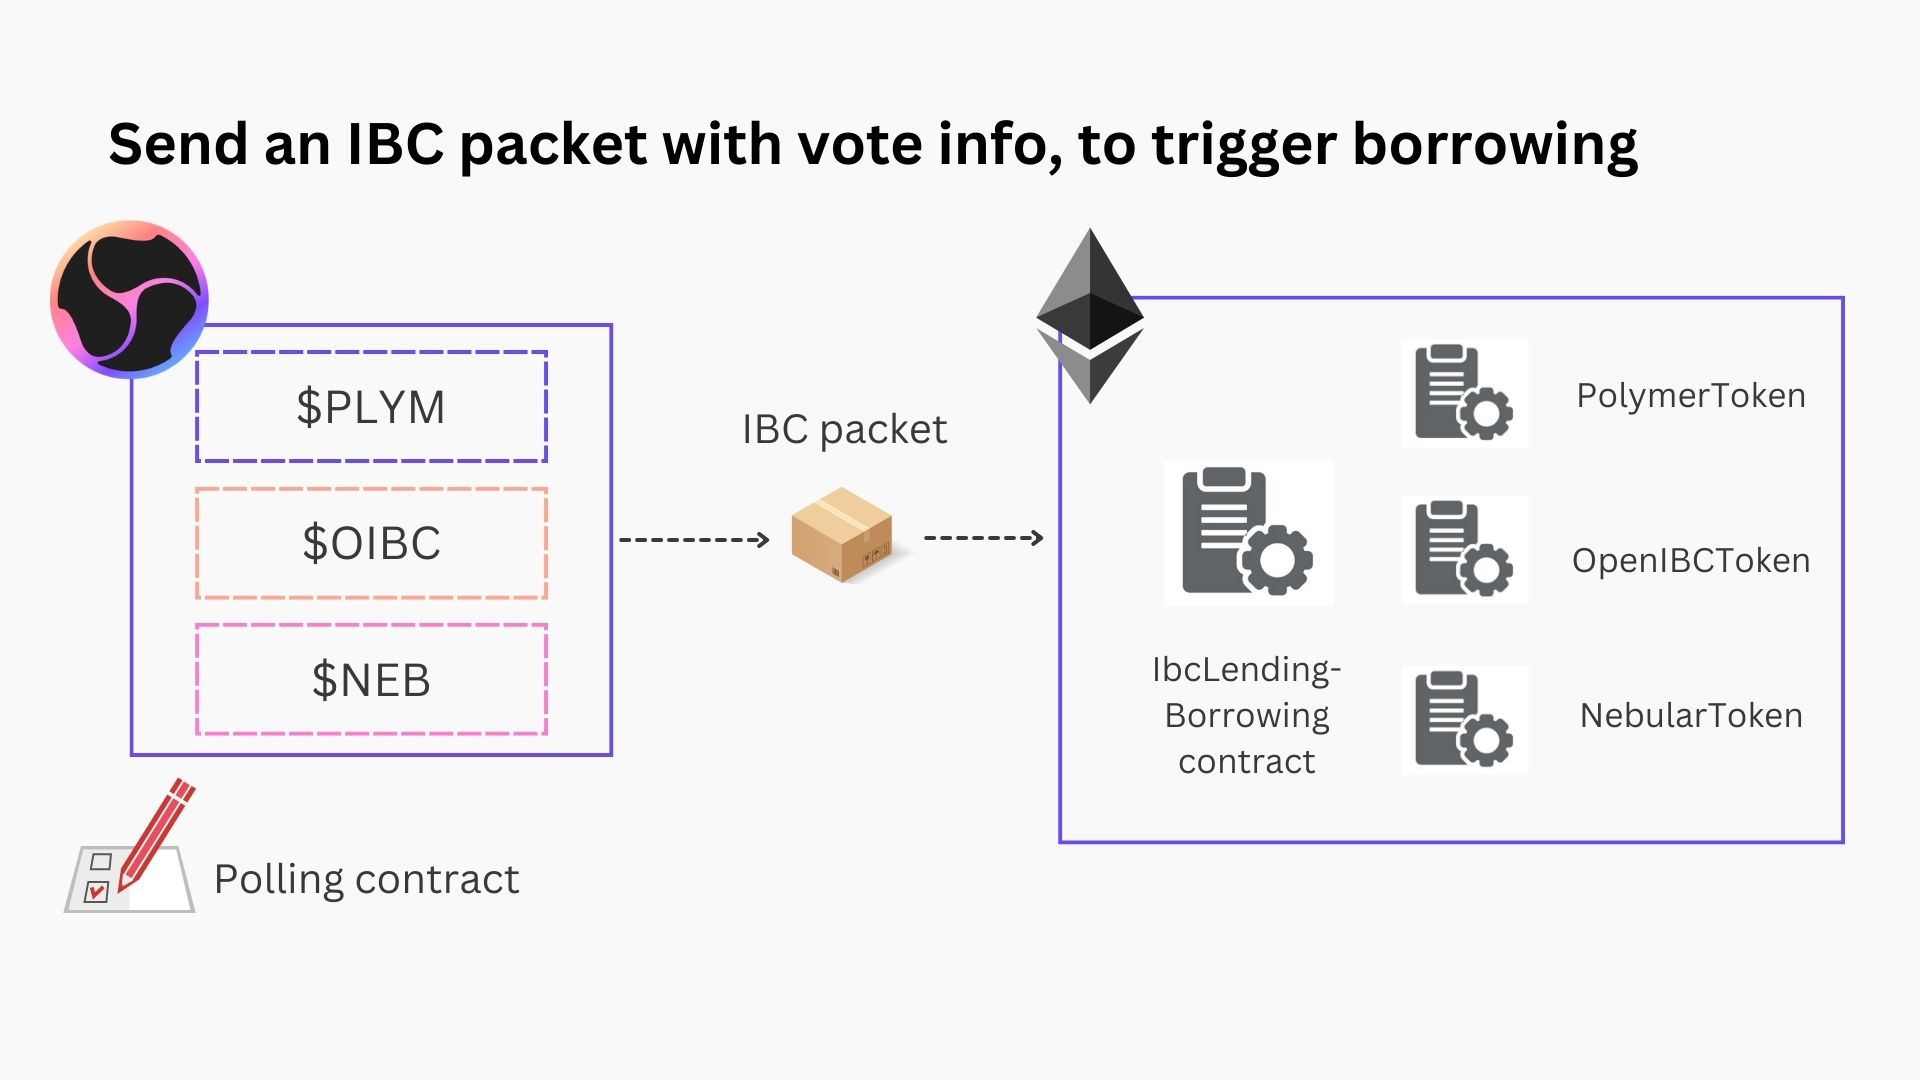
- Once the poll is ended, we can send the result over IBC to trigger the borrowing on Ethereum
This functionality is included in the polling.sh script.
# Update according to the shell you're using
zsh ./polling.sh
The last command there is a message that should send an IBC packet with the information of the poll to execute the loan on the EVM side.
We can check the events and trace packets to see if we succeeded.
Packet tracing and Events
As a first quick check to see if the packet has been successfully relayed and the loan executed, you can run:
npx hardhat run scripts/check-balances.js --network localibcsdk
If this shows "10n" you're good!
To look at the events for more fine grained details, run one of:
ibctl events polymer -x
ibctl events wasm -x
ibctl events eth:main -x
Note that the flag -x shows more details and is optional.
The events command focuses on all IBC events on a particular chain, alternatively you can trace the packets:
ibctl trace-packets $'eth:channel-0:polyibc.Ethereum-Devnet.37FA111284FBF97318CBe05C37fEC69071Dd4965' $'wasm:channel-0:wasm.wasm.wasm14hj2tavq8fpesdwxxcu44rty3hh90vhujrvcmstl4zr3txmfvw9s0phg4d'
Packet tracing aggregates packet related queries between two "endpoints"; essentially a (channel, port) pair on two chains.
Conclusion
That wraps it up! You've now experienced a workflow where you built cross-chain applications to unlock functionality on one chain from an application flow on a remote chain. How cool is that?
Obviously, the sky is the limit so we look forward to seeing you experiment more with everything this unlocks :)